Day 1
Resources
Welcome to Day 1 folks! In today’s training you learned a lot about the concept of a DocType. Now it is time for you to explore and practice more!
Prerequisites
Before proceeding with this exercise, make sure you do the following:
- Create a new site in your local machine / bench
- Enable developer mode on this site
- Create a new custom app and install it on the above mentioned site (you can name the app
airplane_mode).
Exercise: Airplane Mode
Let us model a hypothetical flight ticket system while learning a few new concepts on the way!
Airline DocType
Since, you now know how to create a new DocType, go ahead and create one with the following specs:
Name
Airline
Naming Rule
Set by User
Fields
- Founding Year (Int, Non-negative)
- Customer Care Number (Data, Mandatory)
- Headquarters (Data, Mandatory)
This DocType (master) will be used to store the data for an Airline. For example, AirAsia, IndiGo etc.
Go ahead, create a few sample records for this.
Airplane DocType
Name
Airplane
Naming Rule
Naming Expression: Name should be of the form: IndiGo-013, AirAsia-006 etc. where the first part is the name of the airline
Fields
- Model (Data, Mandatory)
- Airline (link to Airline DocType, Mandatory)
- Capacity (Int, Non-negative, Mandatory)
This DocType will be used to store a particular flight/airplane of a given Airline. Since, an airline can have multiple airplanes, a link field is used to link every airplane to a given airline. This is a one-to-many relationship, since a particular airplane can belong to only one airline.
Airport DocType
Name
Airport
Naming Rule
Set by user
Fields
- Code (Data, Mandatory)
- City (Data, Mandatory)
- Country (Data, Mandatory)
This DocType will be used to store the master data for airports.
Flight Passenger DocType
This DocType will be used to store the details of a passenger/traveler.
Name
Flight Passenger
Naming Rule
Auto Incrementing Integers: 1, 2, 3, etc.
Fields
- First Name (Data, Mandatory)
- Last Name (Data)
- Date Of Birth (Date, Mandatory)
Meta
- The First Name should be the title field
- Title field should be shown in link fields
Let’s Learn Fetch From
The fetch from feature is a very handy tool when you want to fetch some fields of a DocType to another DocType where it is linked. Let me show you Fetch From in action:
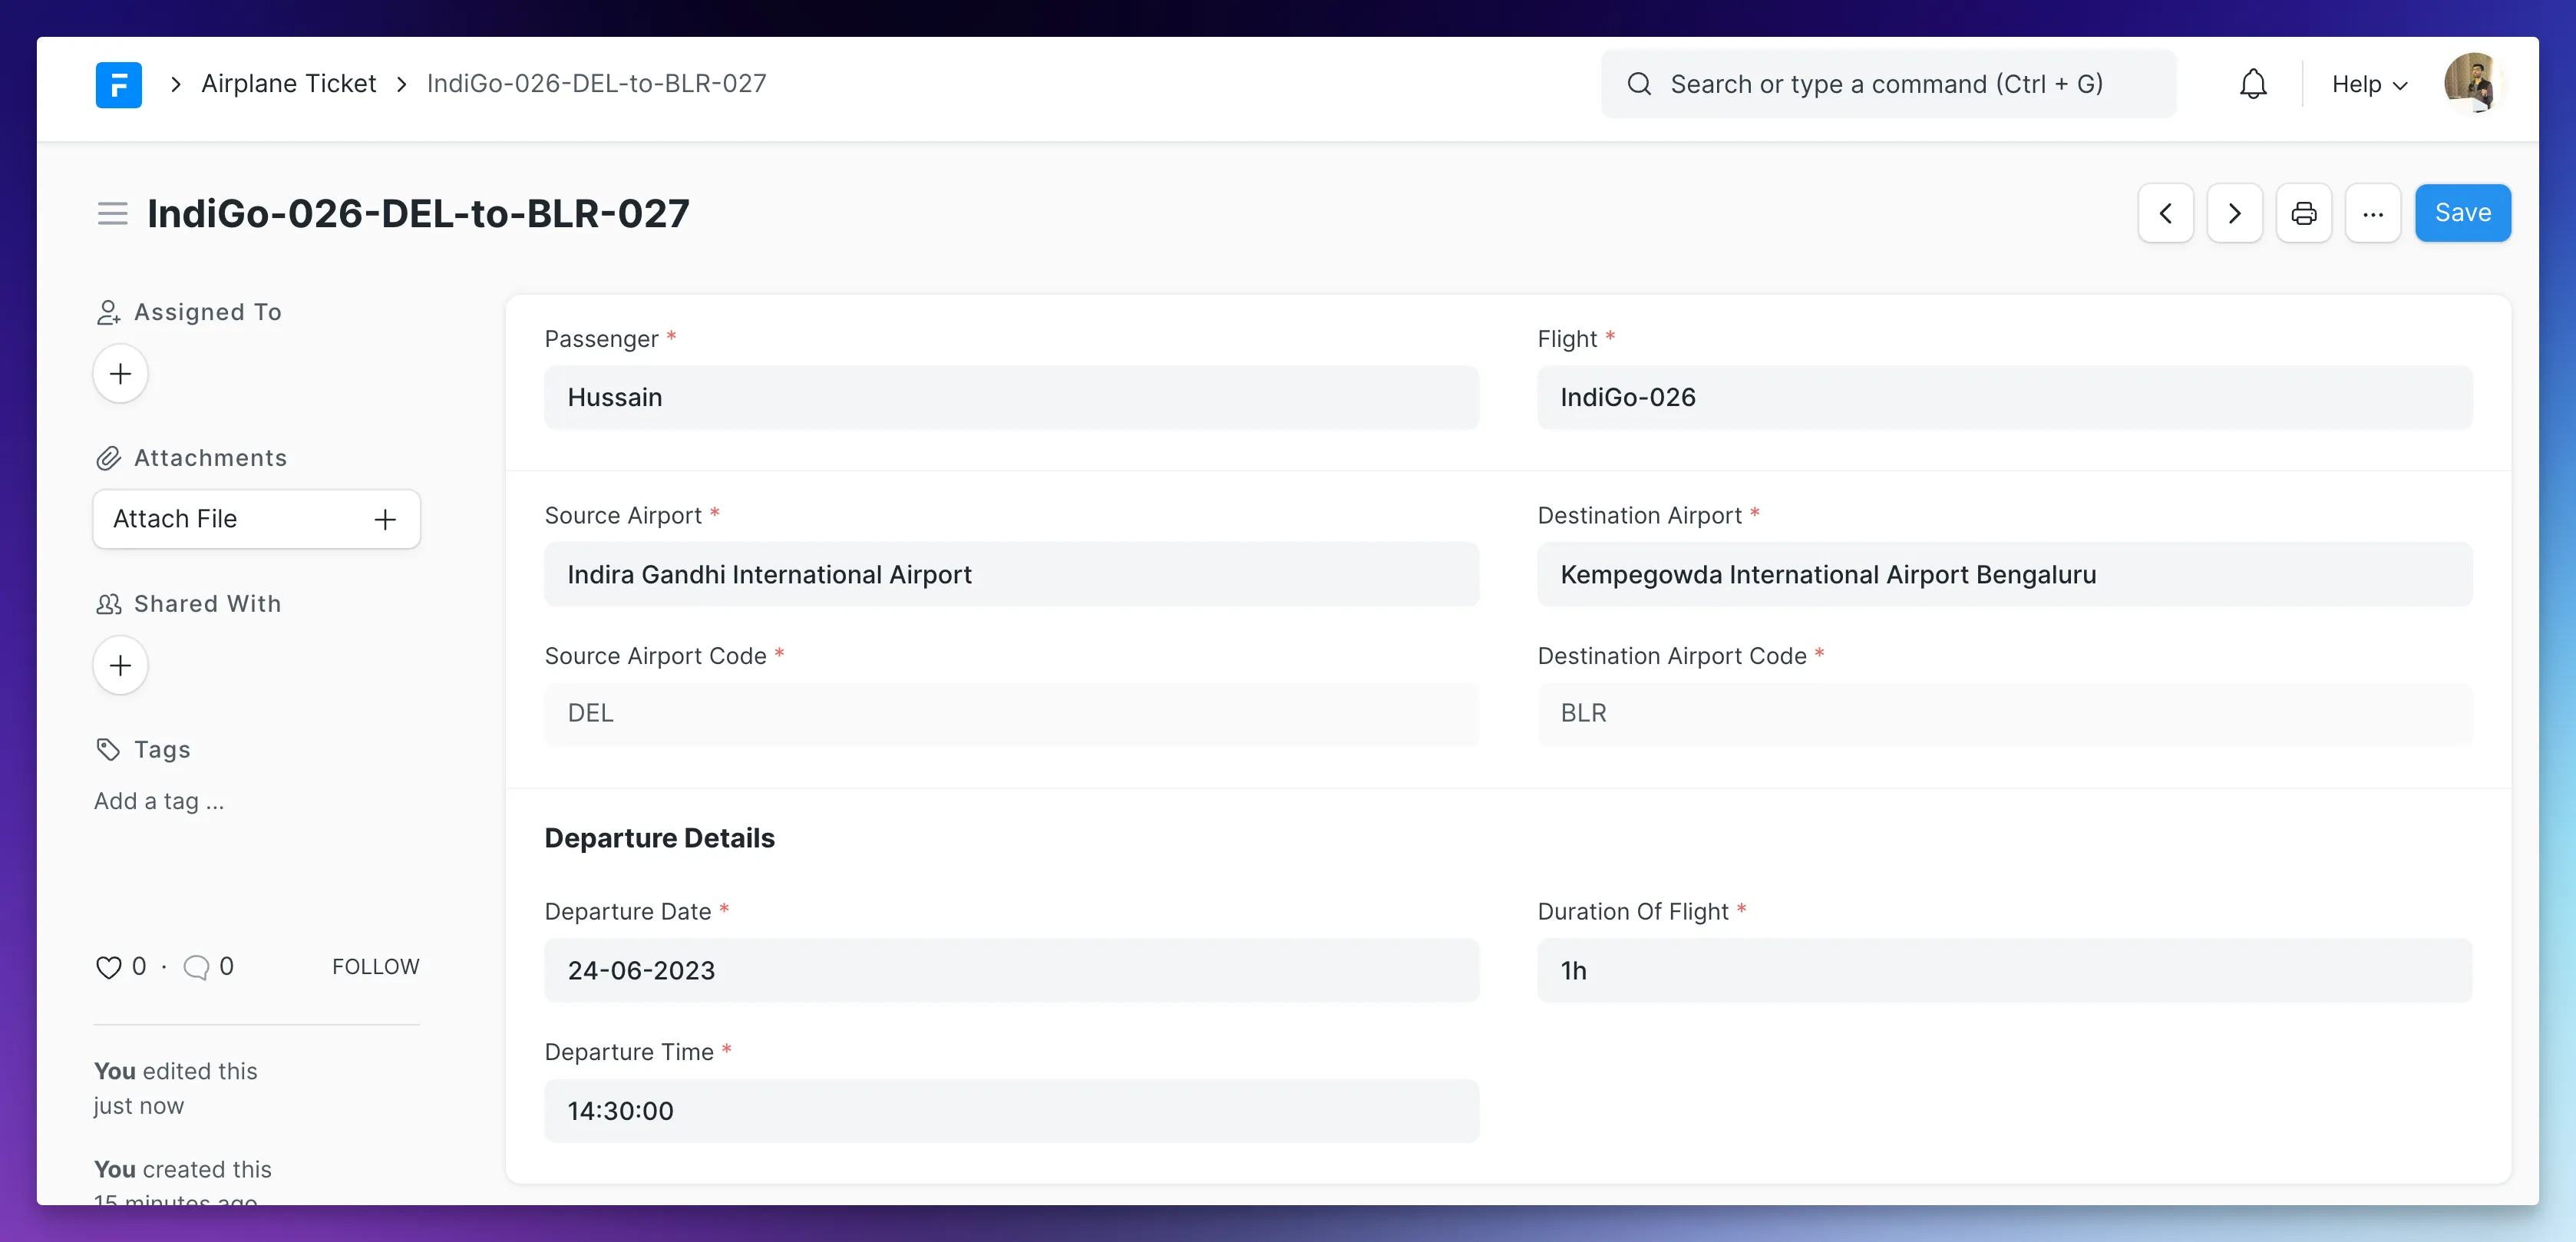
Airplane Ticket DocType
Now this a very core DocType! This DocType must be a Submittable DocType.
Name
Airplane Ticket
Naming Rule
Naming Expression: Name should be of the form: IndiGo-013-BLR-to-BOM-002 where IndiGo-013 is the airplane name, BLR is the code of the source airport and BOM is the code of the destination airport
Fields
- Passenger (link to Flight Passenger, Mandatory)
- Source Airport (link to source Airport, Mandatory)
- Destination Airport (link to destination Airport, Mandatory)
- Source Airport Code (fetched from
Source Airport, Read-only, Mandatory) - Destination Airport Code (fetched from
Destination Airport, Read-only, Mandatory) - Flight (link to Airplane DocType, Mandatory)
- Departure Date (Date, Mandatory)
- Departure Time (Time, Mandatory)
- Duration of Flight (Duration, Mandatory)
The form should look identical to the screenshot below, along with the column and section breaks:
Meta
- Any changes to a document of this DocType should be tracked.
- The source and destination airport codes should be visible in the list view
- Departure Date should be in the standard list view filters
Document States
Connections / Linked Documents
Ticket Status
- Add a new field named
Status(Select, Mandatory) in your Airplane Ticket DocType. The options should be:Booked,Checked-In,Boarded. The default should beBooked. - Map the status to colors according to the below shown mappings:
Booked: GrayChecked-In: PurpleBoarded: Green
Airline Connection
- Add a connection link in the Airline DocType that links to all the Airplanes of this airline:
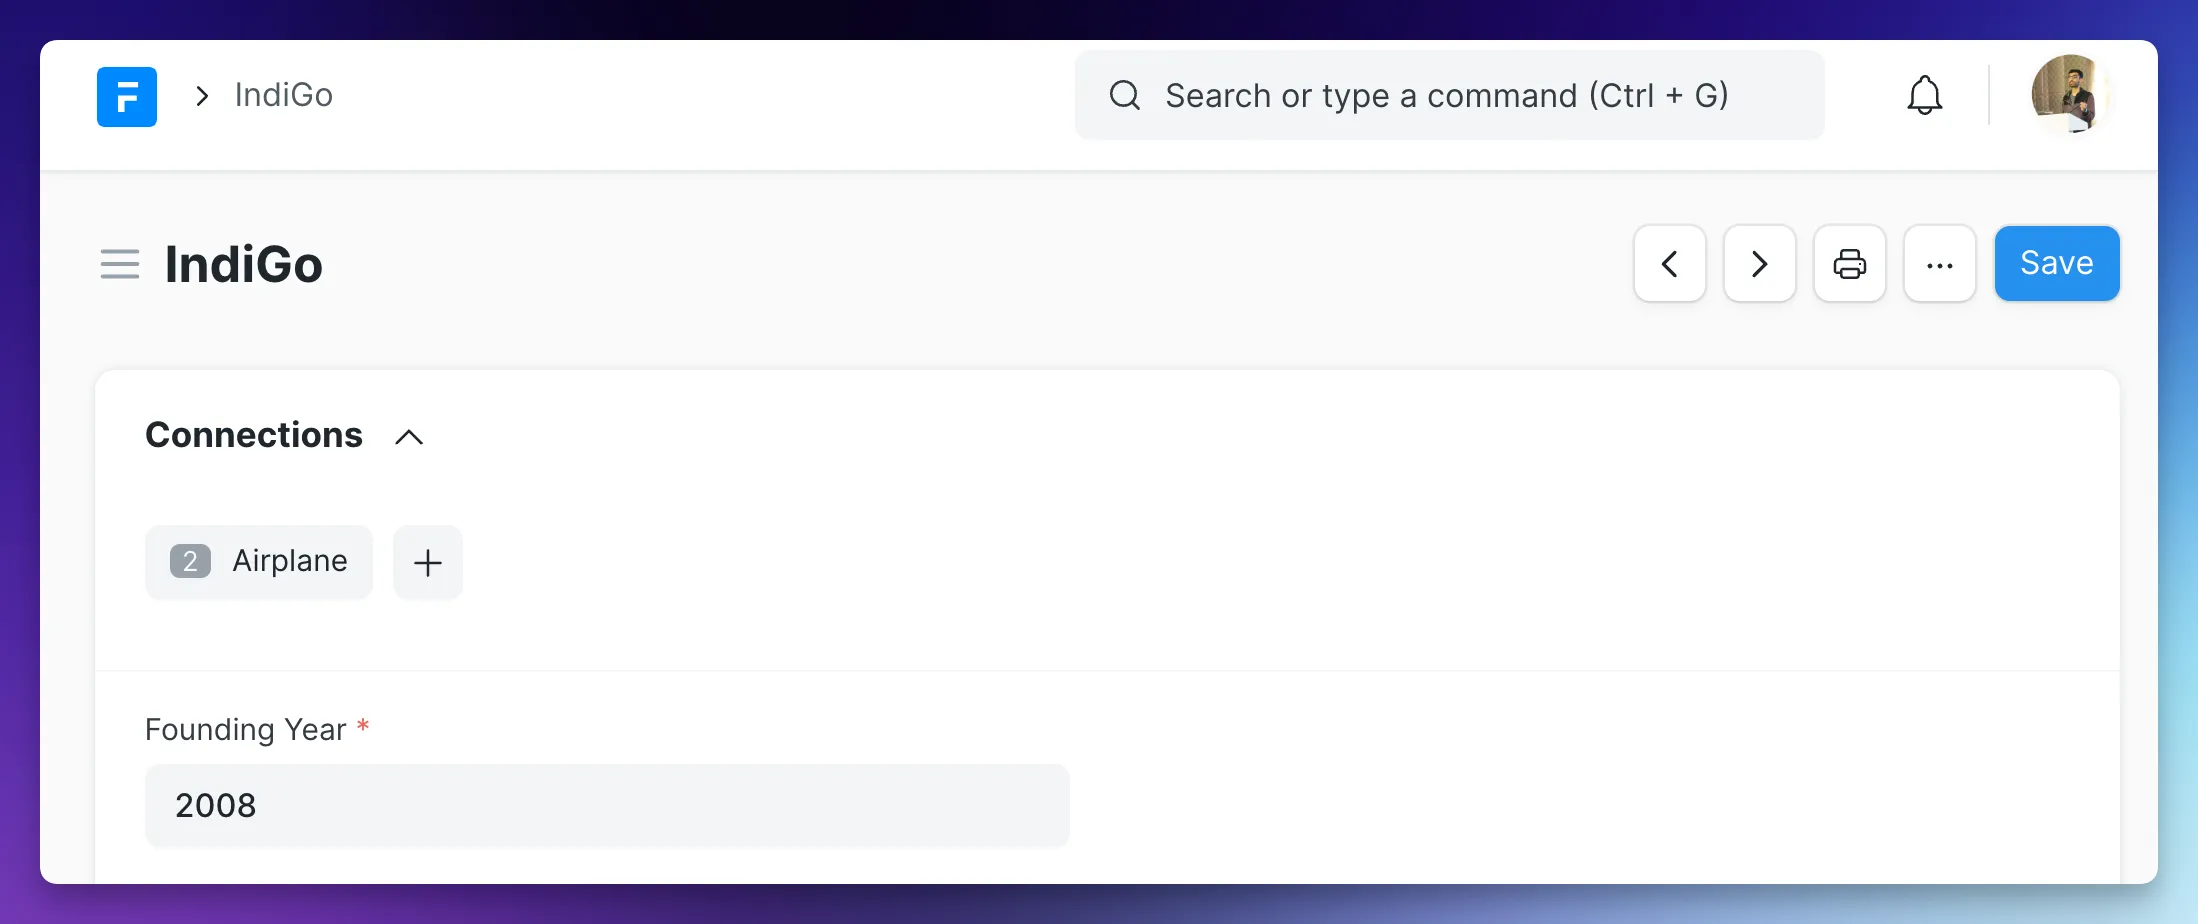
- Add a connection link in the Passenger DocTypes that links to all of her Airplane Tickets:

Airplane Mode Workspace
Start by reading this documentation on Workspaces in Frappe Framework.
Create a new workspace with 3 shortcuts as shown below:
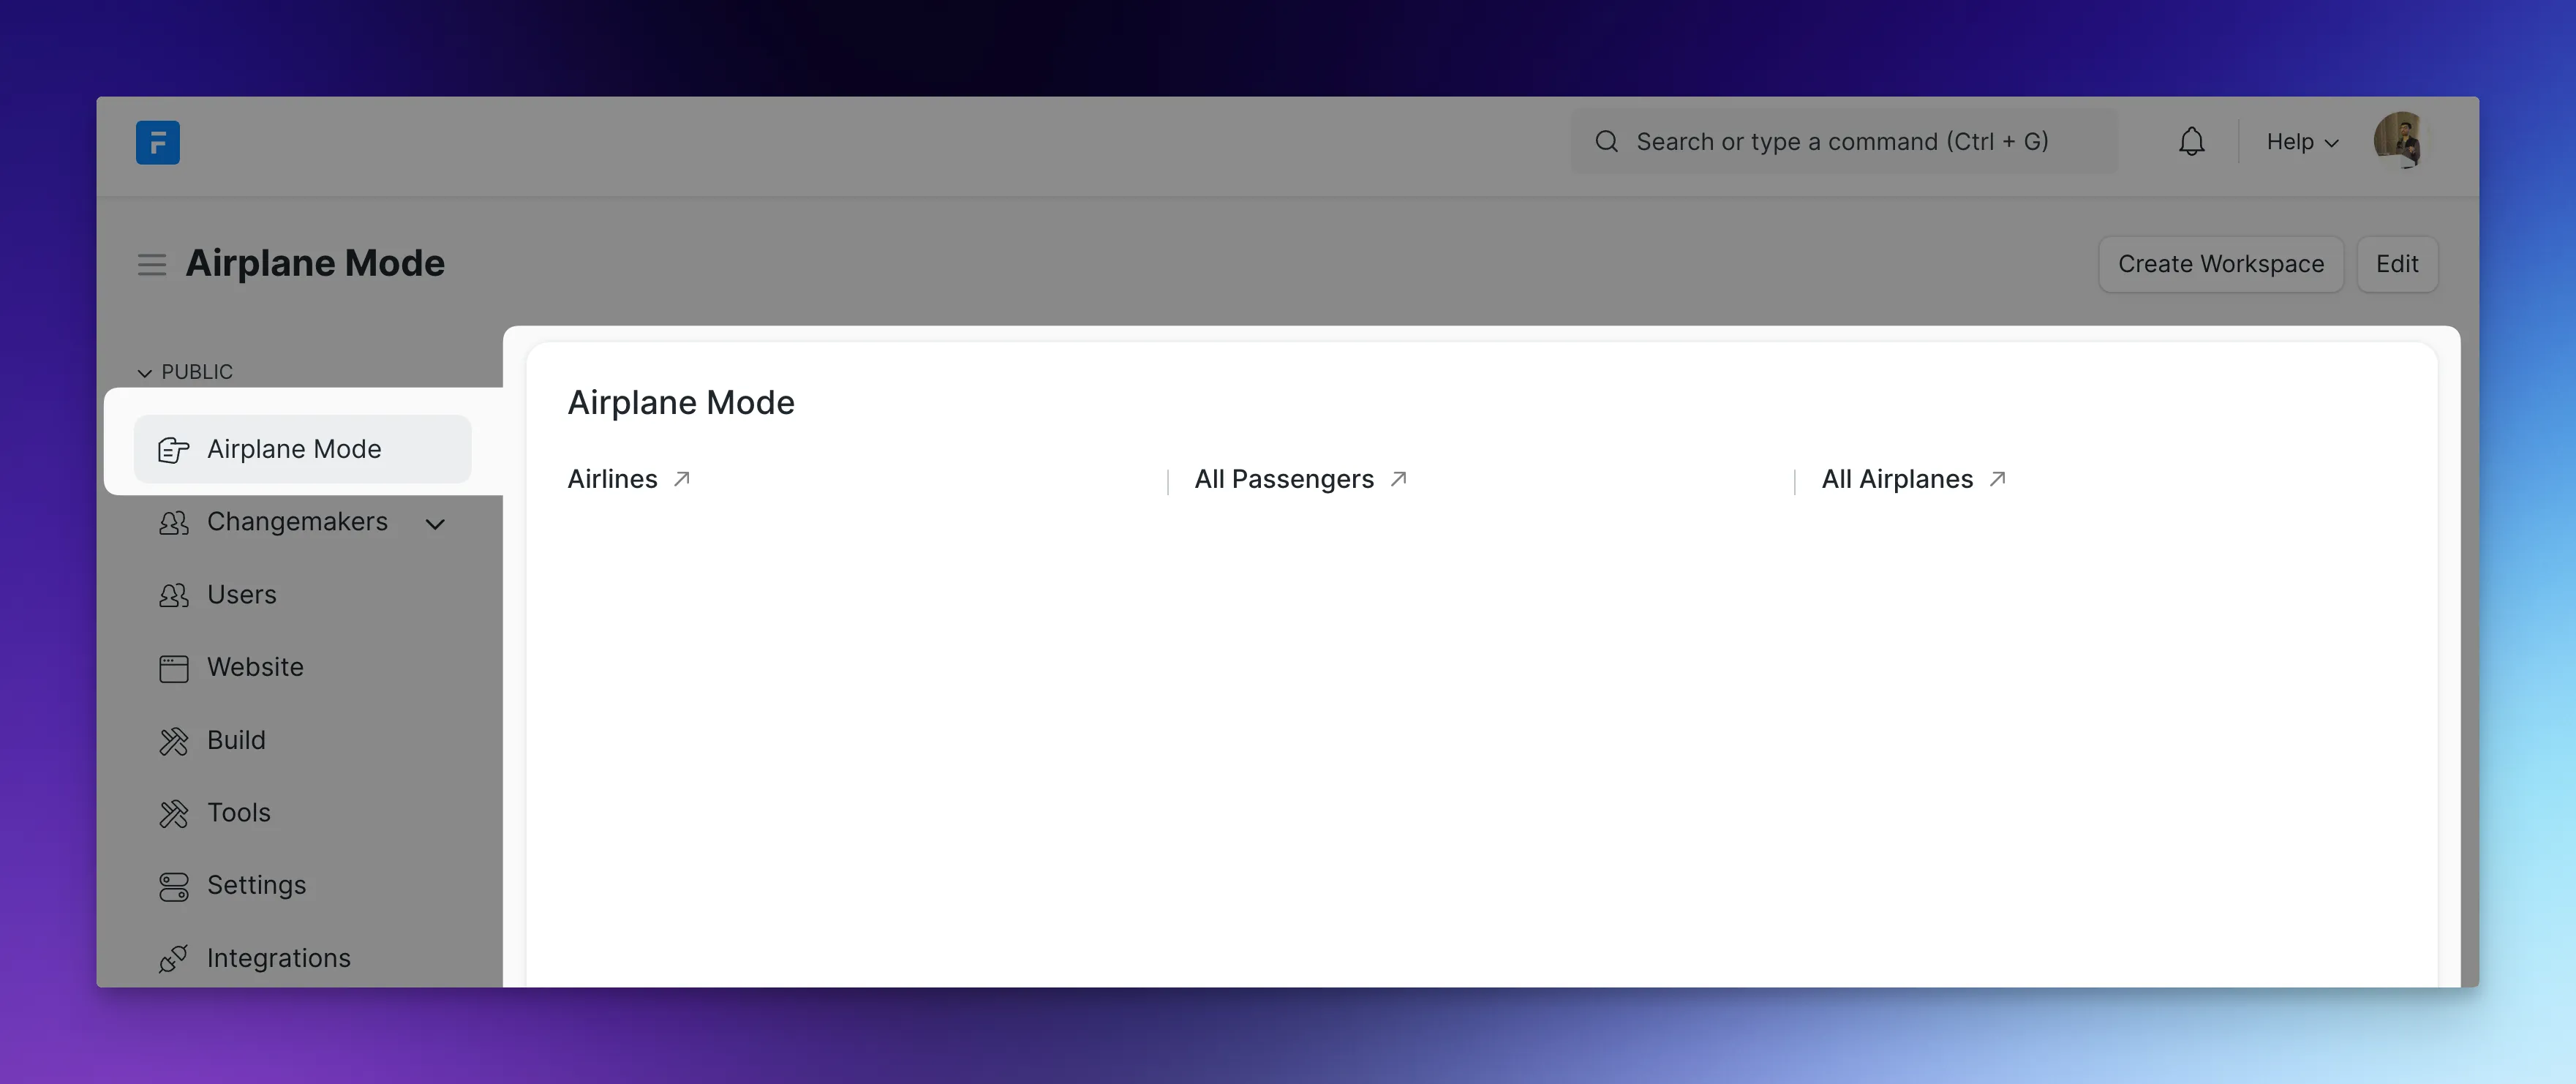
- Airlines: Shortcut to Airline DocType List
- All Passengers: Shortcut to Flight Passenger DocType List
- All Airplanes: Shortcut to Airplane DocType List
Submission [Mandatory for Certification]
Go to your custom app where you have created the above mentioned DocTypes and compress the files airplane.json, airline.json, airplane_ticket.json and flight_passenger.json to a .zip archive.
Visit this portal to submit your assignment.
If you have any problems in submitting the assignment or find a bug in the portal, please drop me an email at hussain@frappe.io
Essential Reading List
-
Skim though Document API documentation
[BONUS] Would like to get more practice?
If you want to tackle some more challenges, you can try to achieve the following:
-
Use a tool like Postman or Insomnia or
curlto talk to the REST API to perform CRUD (create, read, update, delete) operation on Airline and Airplane DocTypes. -
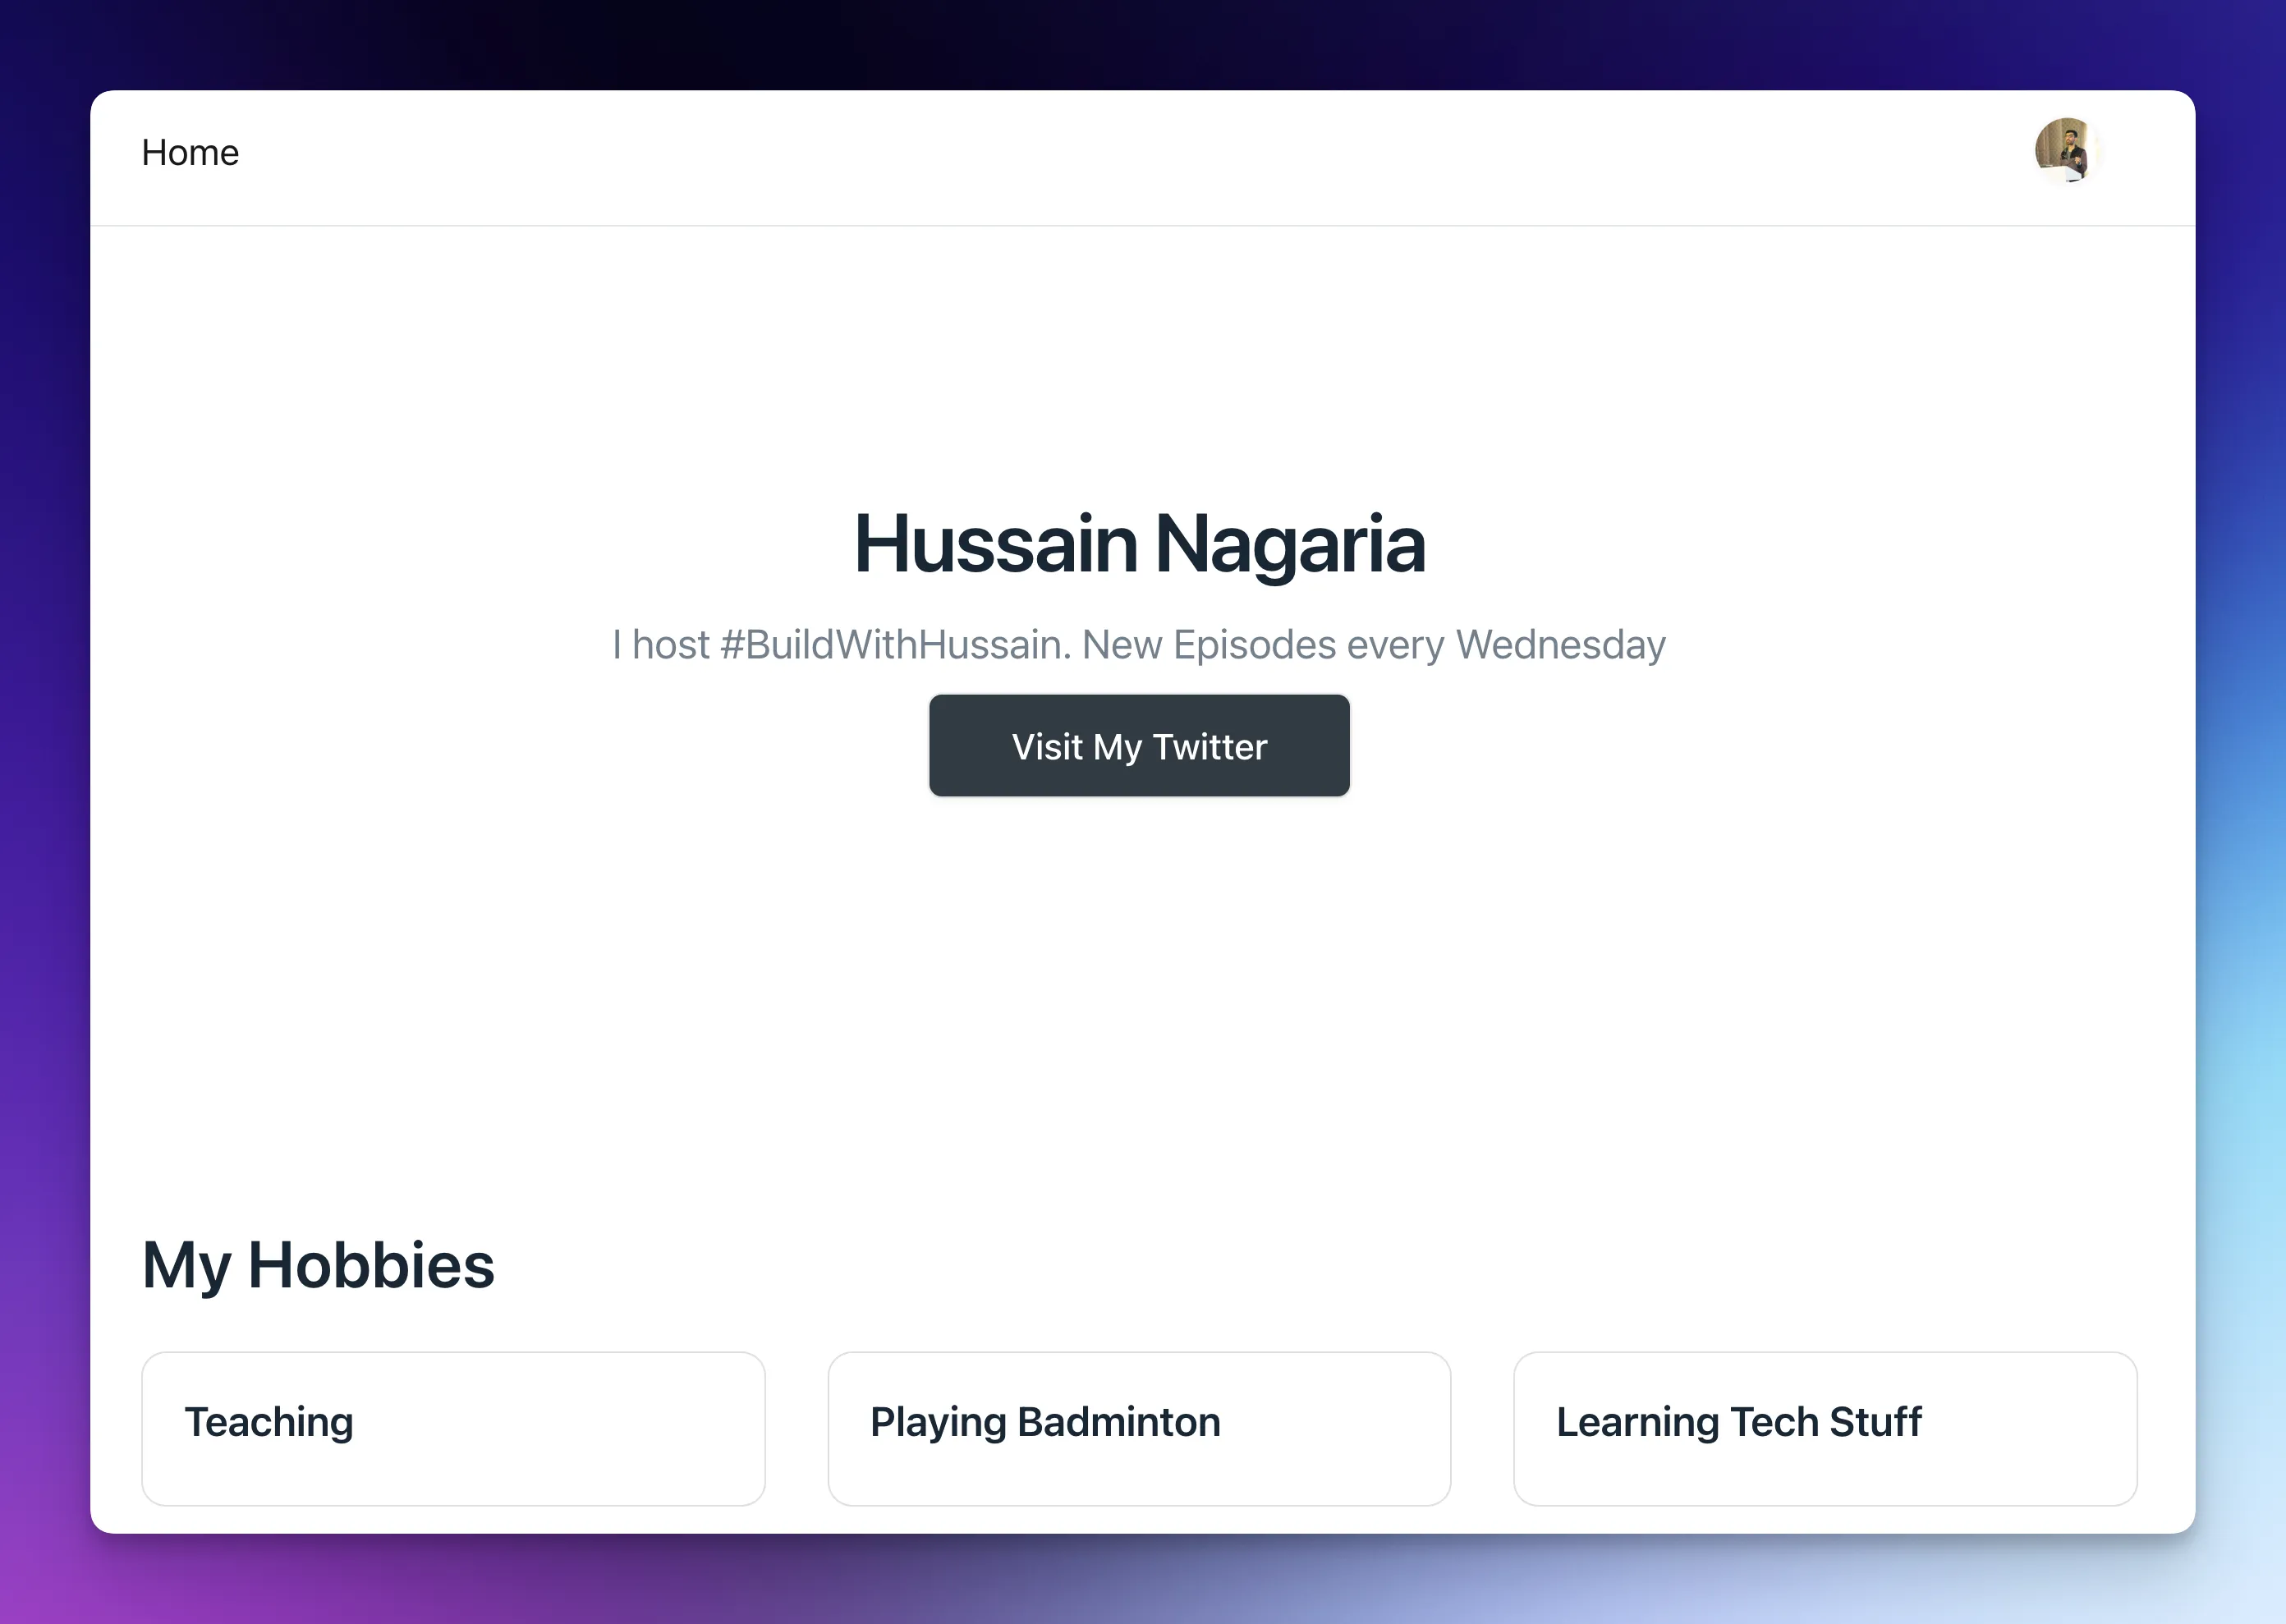
Create a new Web Page (using
Web PageDocType) accessible at/about-meroute with a Hero section and cards section identical to the one in the screenshot:
-
Use the Data Import tool to import 5 new
Airlinerecords into the system. -
Use the Data Export tool to export all the
Airplane Ticketdocuments (be sure to create some test records first!) as a CSV file.